
Ceiling Fan Installation Cost: Twin Cities Prices

Key Takeaways
- Ceiling fan installation cost in Minneapolis averages $273, with a typical range of $161 to $388.
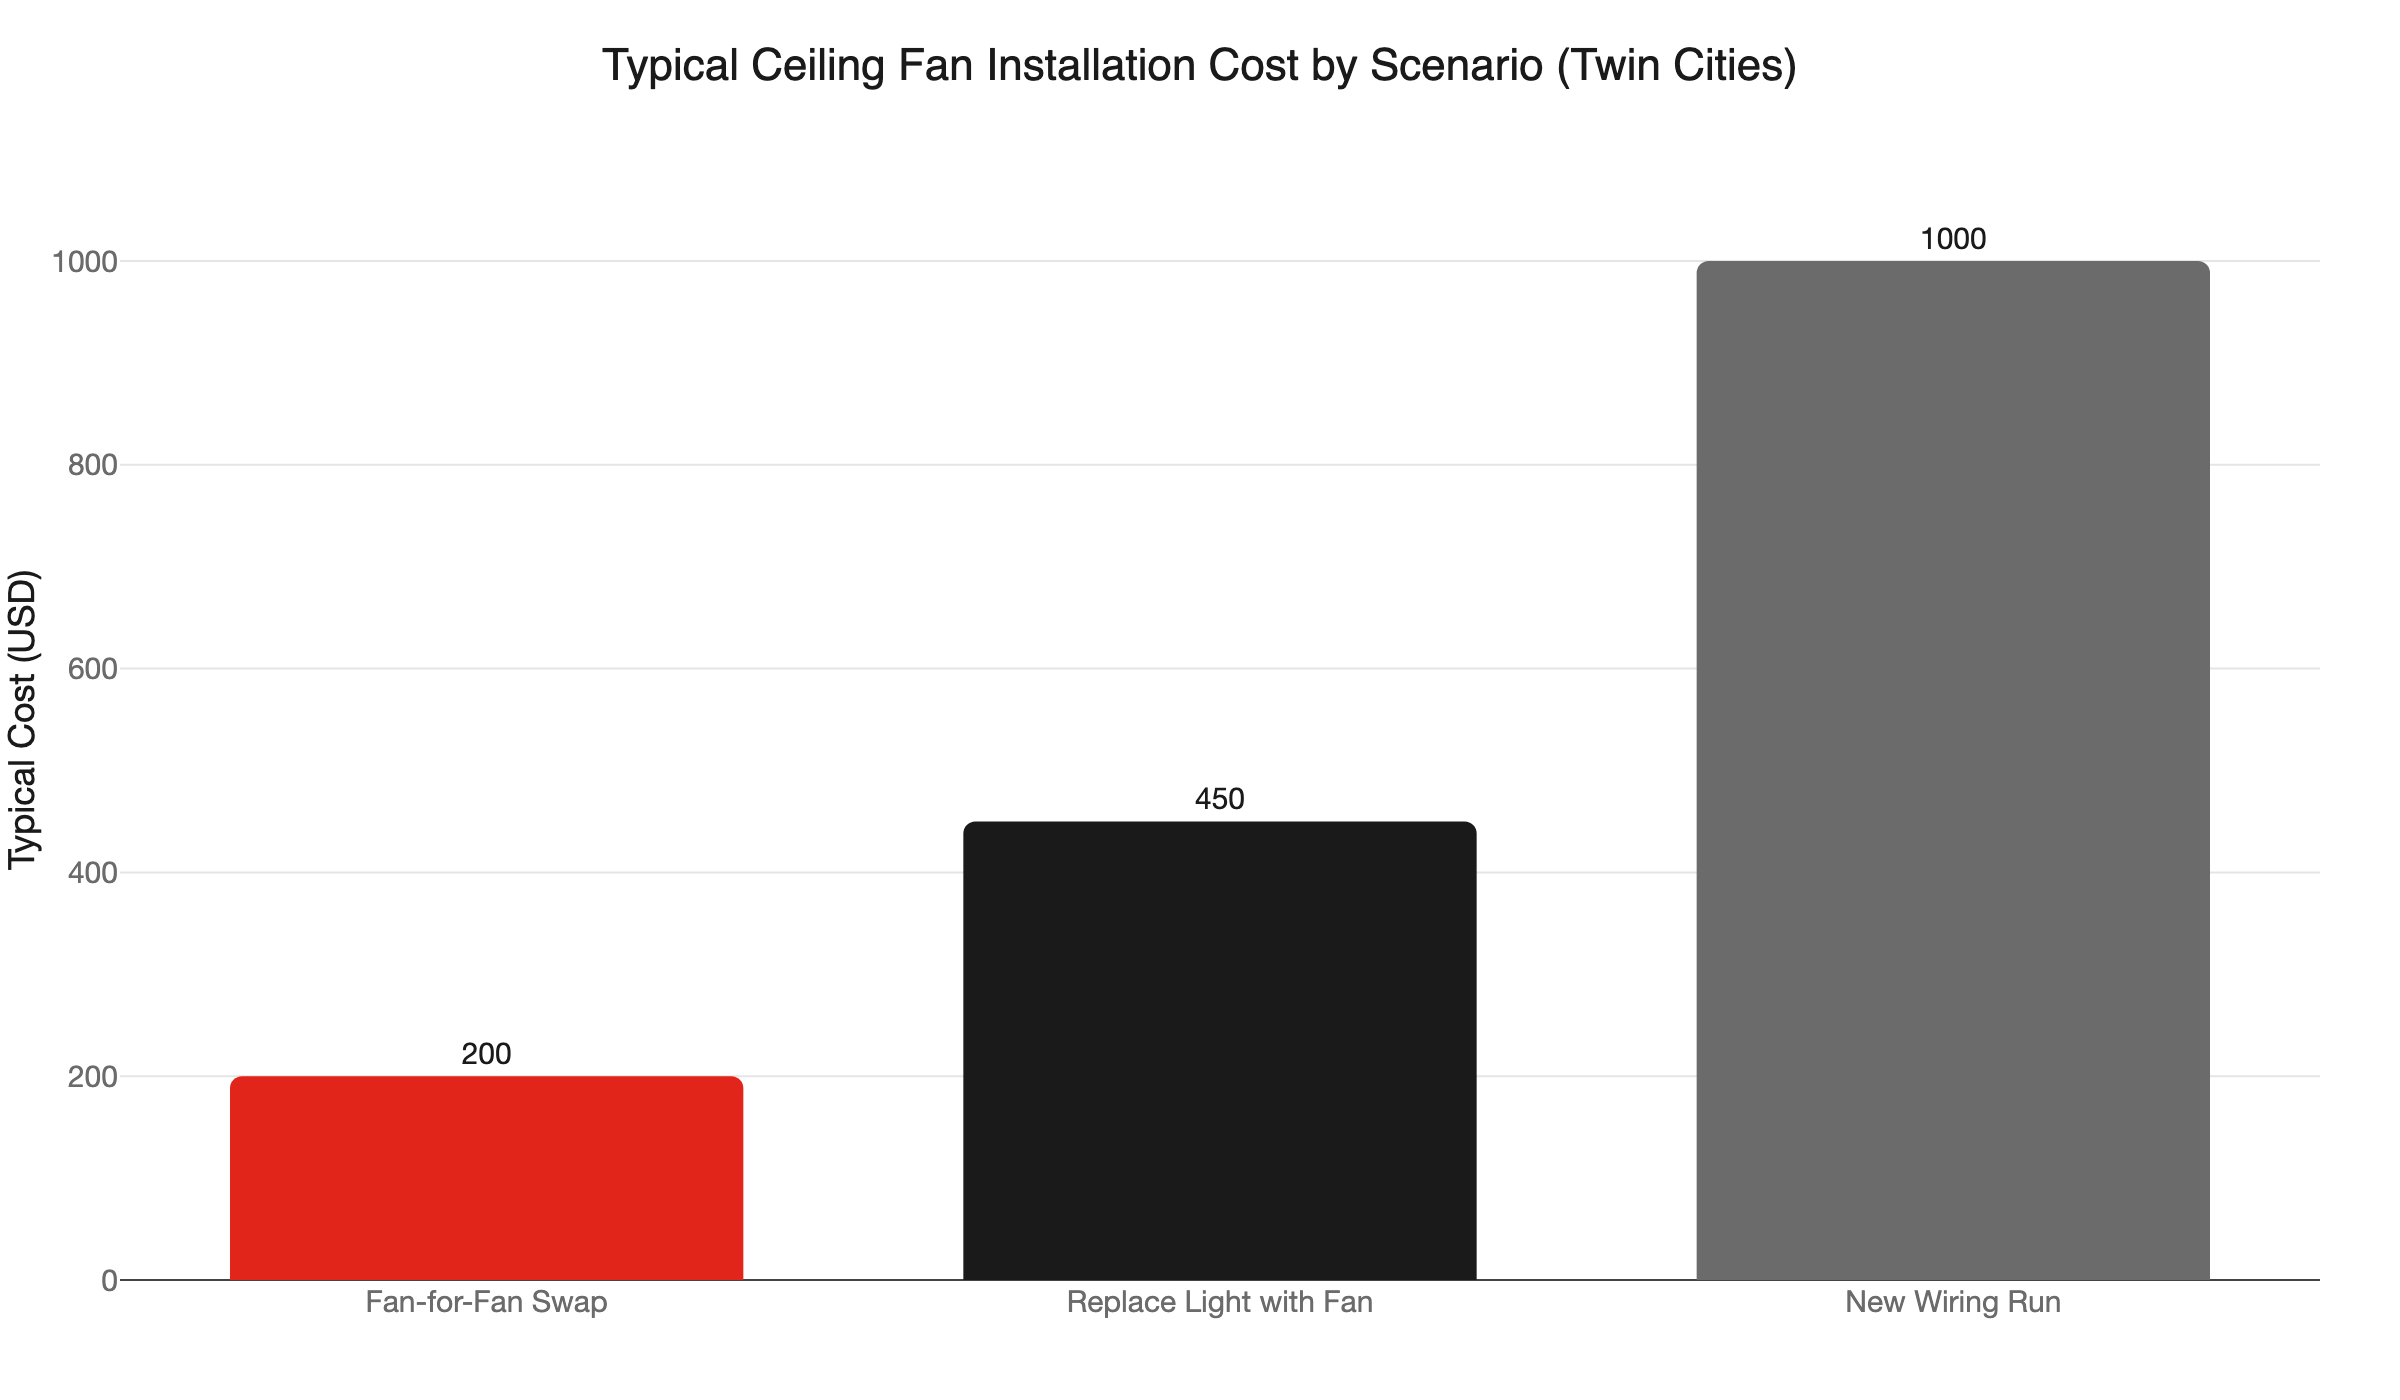
- Three scenarios determine the price: fan-for-fan swap ($100-$300), replacing a light fixture with a fan ($300-$600+), and running new wiring to a bare ceiling (starting at $350, up to $2,000).
- Wire access is the biggest hidden cost driver. Routing cable through a finished ceiling means cutting and patching drywall.
- Fan blades must stay at least 7 feet off the floor. Downrod length is set by ceiling height.
- Most smart fan controllers require a neutral wire at the switch box. Many older Twin Cities homes do not have one there.
- Xcel Energy does not offer a ceiling fan rebate in its current Minnesota residential program.
- A permit is required when new wiring is involved. Minnesota homeowners can file their own online at ims.dli.mn.gov.
What Does Ceiling Fan Installation Cost in Minneapolis?
The short answer: Minneapolis homeowners pay an average of $273, with a range of $161 to $388. Simple swaps land at the low end. Jobs requiring new wiring or a new box land higher.
Nationally, This Old House puts a basic fan swap at $100 to $300. Jobs that require new wiring or a new box climb to $300 to $600 or more. Running cable to a ceiling with no existing fixture can reach $2,000.
The wide range is not random. It traces directly to how much work happens inside your ceiling and walls. The three scenarios below explain what actually changes from job to job.
Whenever you are ready for an accurate quote, our ceiling fan installation team can assess your specific situation.
The Three Scenarios That Determine Your Ceiling Fan Installation Cost
Every ceiling fan installation falls into one of three categories. Knowing which one applies to you is the most useful step before calling for a quote.
Scenario 1: Fan-for-Fan Swap
You have an existing ceiling fan. You want a different one in the same spot.
This is the simplest scenario. The electrician confirms the existing box is fan-rated. They disconnect the old fan and wire up the new one. The cable in the ceiling stays put. No drywall work is required. A permit is generally not needed for a like-for-like swap.
Typical ceiling fan installation cost: $100 to $300 (This Old House). A standard job in this category runs around $200.
One caveat: if the existing box is not fan-rated, it must be replaced before the new fan goes up. A standard outlet box or junction box cannot legally support a ceiling fan. Fan-rated boxes handle up to 70 lbs and the oscillating load a spinning fan places on the mount. Standard boxes do not. Swapping in the right box adds a modest cost and keeps the job simple.
Scenario 2: Replacing a Light Fixture with a Fan
You have a ceiling light. You want a ceiling fan with a light kit where that fixture currently hangs.
This scenario costs more because the existing wiring may not support fan control. A standard light switch runs one circuit leg to one load. Most ceiling fans separate the motor and the light kit onto different controls. That often means updating the switch wiring. The existing box almost always needs to be swapped for a fan-rated one.
Typical ceiling fan installation cost: $300 to $600+ (This Old House). Most standard bedroom or living room conversions run around $400 to $450.
This is the most common install type when Twin Cities homeowners add a first ceiling fan to an existing room.
Scenario 3: Running New Wiring to a Brand-New Location
There is nothing in your ceiling. No light. No fan. You want a ceiling fan somewhere no fixture has ever existed.
This is the most complex and most expensive scenario. The electrician runs new cable from your panel or an existing circuit to the new location. A fan-rated box goes in. A wall switch or remote control gets set up for operation. The biggest variable is ceiling accessibility.
An open attic above the install point makes cable routing fast and clean. A finished ceiling with no attic access means cutting into drywall, fishing wire through wall cavities, and patching every cut afterward. That drywall work can cost as much as the electrical work itself.
Typical ceiling fan installation cost: $350 to $2,000 (This Old House). Most standard jobs in accessible ceilings run around $700 to $1,000.
If the new location requires its own circuit pulled from the panel, that adds to the total. Our post on dedicated circuits and when they are the right call covers that in more detail.
Why Does Wire Access Drive Up the Cost?
The short answer: When cable must change direction inside a finished ceiling, the electrician cuts access holes to route it. Patching those holes can cost as much as the electrical work itself.
This Old House identifies wire access as the single biggest hidden cost driver in ceiling fan installation. An open attic above the install point makes the job fast. A finished ceiling with no attic access above it is the opposite.
Every bend in the cable path may require a separate access cut. Each cut needs to be patched, skim-coated, and painted to be invisible afterward. In some rooms, the drywall repair takes more time than the wiring.
If you are planning a Scenario 3 install in a room without attic access, ask for a detailed line-item quote. Get the drywall patching cost separated from the electrical labor in writing. Some homeowners handle painting after patching to reduce the total bill.
How Do I Know What Downrod Length I Need?
The short answer: Subtract 9 feet from your ceiling height. That is the approximate downrod length you need. Fan blades must clear the floor by at least 7 feet. The ideal operating height is 8 to 9 feet off the floor.
Getting downrod length wrong is one of the most common mistakes homeowners make when purchasing a fan before calling an electrician. The wrong size means the fan either hangs too close to the ceiling to move air effectively or sits low enough to be a hazard.
NEC requirements enforce a minimum 7-foot blade clearance from the floor through manufacturer listing requirements. Blades also need 8 to 10 inches of clearance from the ceiling surface above them.
Here is the breakdown by ceiling height, per Delmar Fans:
- 8-foot ceiling: Flush-mount (hugger) fan only. No downrod will fit here.
- 9-foot ceiling: 6-inch downrod.
- 10-foot ceiling: 12-inch downrod.
- 12-foot ceiling: 24 to 36-inch downrod.
- 14-foot or vaulted ceiling: 48 to 60-inch downrod, sometimes longer.
Vaulted and angled ceilings add a step. They require an angled mounting bracket in addition to the longer downrod. If you are ordering a fan yourself, measure the ceiling height at the exact install point. Note whether the ceiling is flat or sloped before placing the order. The wrong downrod means an extra trip.
Minnesota homes with great rooms and cathedral ceilings are common candidates for extended downrods. Measure twice before buying.
Do Smart and Remote Ceiling Fans Cost More to Install?
The short answer: Yes, sometimes by a meaningful margin. Smart fan controllers typically need a neutral wire at the switch box. Many Twin Cities homes built before the 1980s do not have one there.
This Old House puts smart fans at $120 to $1,000 or more depending on the model. That is the fan cost alone. The wiring situation at your wall switch is a separate issue.
Most smart wall switches and electronic speed controllers need three conductors at the switch box: hot, neutral, and ground. A switch loop - the wiring method common in older Minnesota construction - brings only a hot and a switched hot to the switch. There is no neutral.
When there is no neutral at the switch, you have three options:
- Run new cable. The electrician pulls a new cable to bring a neutral to the switch location. This gives you full compatibility with any smart controller. It adds labor cost but solves the problem permanently.
- Choose a no-neutral-compatible controller. Some smart switch brands work without a neutral wire. Selection is narrower, but reliable options exist.
- Use a wireless remote kit inside the canopy. A universal remote receiver runs $15 to $30 and mounts inside the fan canopy. It accepts signals from a handheld remote. No neutral wire required. No smart-home app integration, but full speed and light control without changing the wall wiring.
An electrician can identify which option fits your wiring in a few minutes. That check is worth doing before you order a specific fan model or controller.
Does Xcel Energy Offer a Ceiling Fan Rebate?
The short answer: No. Ceiling fans are not part of Xcel Energy’s current Minnesota residential rebate program.
This is a common question before scheduling an install. The Xcel Energy Minnesota residential rebate portfolio covers gas furnaces, heat pumps, central air conditioning, smart thermostats, insulation, and water heaters. Ceiling fans are not included for 2024 to 2026.
That said, a ceiling fan delivers real savings even without a rebate. A fan circulating air in summer lets you set your thermostat a few degrees higher. You feel equally cool, but the AC runs less. That is a direct reduction to your monthly Xcel bill from late May through September.
If you are looking for a program to tap, a smart thermostat rebate is worth checking first. Pairing a programmable thermostat with a ceiling fan is a straightforward combination. The thermostat handles setpoints and the fan handles airflow, and you get rebate credit on the thermostat.
Do I Need a Permit to Install a Ceiling Fan in Minnesota?
The short answer: You need a permit when the job involves new wiring. Replacing a fan in an existing fan-rated box typically does not require one. Running new cable or adding a new circuit always does.
Minnesota adopted the 2023 National Electrical Code effective July 1, 2023. All permitted electrical work filed after that date must comply with the 2023 NEC.
Minnesota homeowners can pull their own electrical permit online at ims.dli.mn.gov for work on their own home. One critical detail: wiring that gets covered before inspection means you bear the full cost of uncovering and re-exposing it. Getting inspection scheduled at the right point in the job is part of doing the work correctly.
The authority having jurisdiction (AHJ) also varies across the Twin Cities. Some Minnesota cities use state inspectors through the DLI. Others operate their own local inspection programs. The MN DLI recommends confirming your AHJ before filing.
When our team handles the install, we take care of permit filing and inspection coordination. You do not need to track down the right office or manage the inspection timing yourself.
Why Does the Ceiling Box Matter?
The short answer: A standard outlet or junction box cannot legally support a ceiling fan. Fan-rated boxes are built for the weight and the oscillating load a fan creates. Using the wrong box is a real safety hazard.
No malarky: this is not a fine-print technicality. A ceiling fan mounted to a non-fan-rated box can work loose over months of use. Eventually it can fail and fall. Fan-rated boxes are specifically listed to support fans up to 70 lbs and to handle the continuous vibration and lateral forces a spinning fan generates. Standard boxes handle static loads only.
If you are converting a light fixture location to a ceiling fan, assume the box needs to change. It is a small cost within the overall job. Skipping it creates a hazard that is easy to avoid.
This is one of the most important reasons to have a licensed electrician handle ceiling fan installation rather than treating it as a weekend project. Our post on why DIY electrical work carries real risk walks through the most common places homeowners get hurt on jobs like this one.
Will My Electrical Panel Be Affected?
The short answer: Usually not. Most fans tap an existing circuit and draw modest power. If that circuit is already loaded, or the new location needs its own circuit, the panel becomes part of the conversation.
A standard residential ceiling fan draws 15 to 75 watts. That is a light load. But if the circuit serving that room trips regularly now, adding another load without addressing the panel is not the right move. A circuit that trips is telling you it is at capacity.
Our post on signs your electrical panel may need an upgrade covers the symptoms worth watching before adding any new load to an existing circuit. A licensed electrician checks available capacity before pulling new wiring. That assessment is part of the job, not an extra step you have to request.
Schedule Your Ceiling Fan Installation in the Twin Cities
Northern Mister Sparky is locally owned and operated. We serve Minneapolis, St. Paul, Bloomington, Brooklyn Park, Woodbury, Blaine, Maple Grove, Plymouth, and the surrounding Twin Cities metro.
Our ceiling fan installation service covers all three scenarios: a straightforward fan swap, a light-fixture-to-fan conversion, and a brand-new wiring run from scratch. We bring fan-rated boxes, handle permits, and confirm the wiring is code-compliant before we leave. Every job is backed by the UWIN(R) 100% satisfaction guarantee.
Call 763-200-5956 or book online. As America’s On-Time Electrician(R), we show up when we say we will.
Frequently Asked Questions
How much does ceiling fan installation cost in Minneapolis? +
Do I need a permit to install a ceiling fan in Minnesota? +
Can I install a ceiling fan where there is no existing light fixture? +
Does Xcel Energy offer a rebate for ceiling fans? +
Need an electrician now?