
Doorbell Transformer Replacement Wiring: A Twin Cities Guide

Key Takeaways
- Doorbell transformer replacement wiring involves both low-voltage (16-24V) and line-voltage (120V) connections. The 120V side requires a permit in Minnesota.
- Many Twin Cities homes built 1950-1980 have the transformer mounted directly to the electrical panel knockout. Working near live bus bars makes this the job homeowners most frequently mishandle.
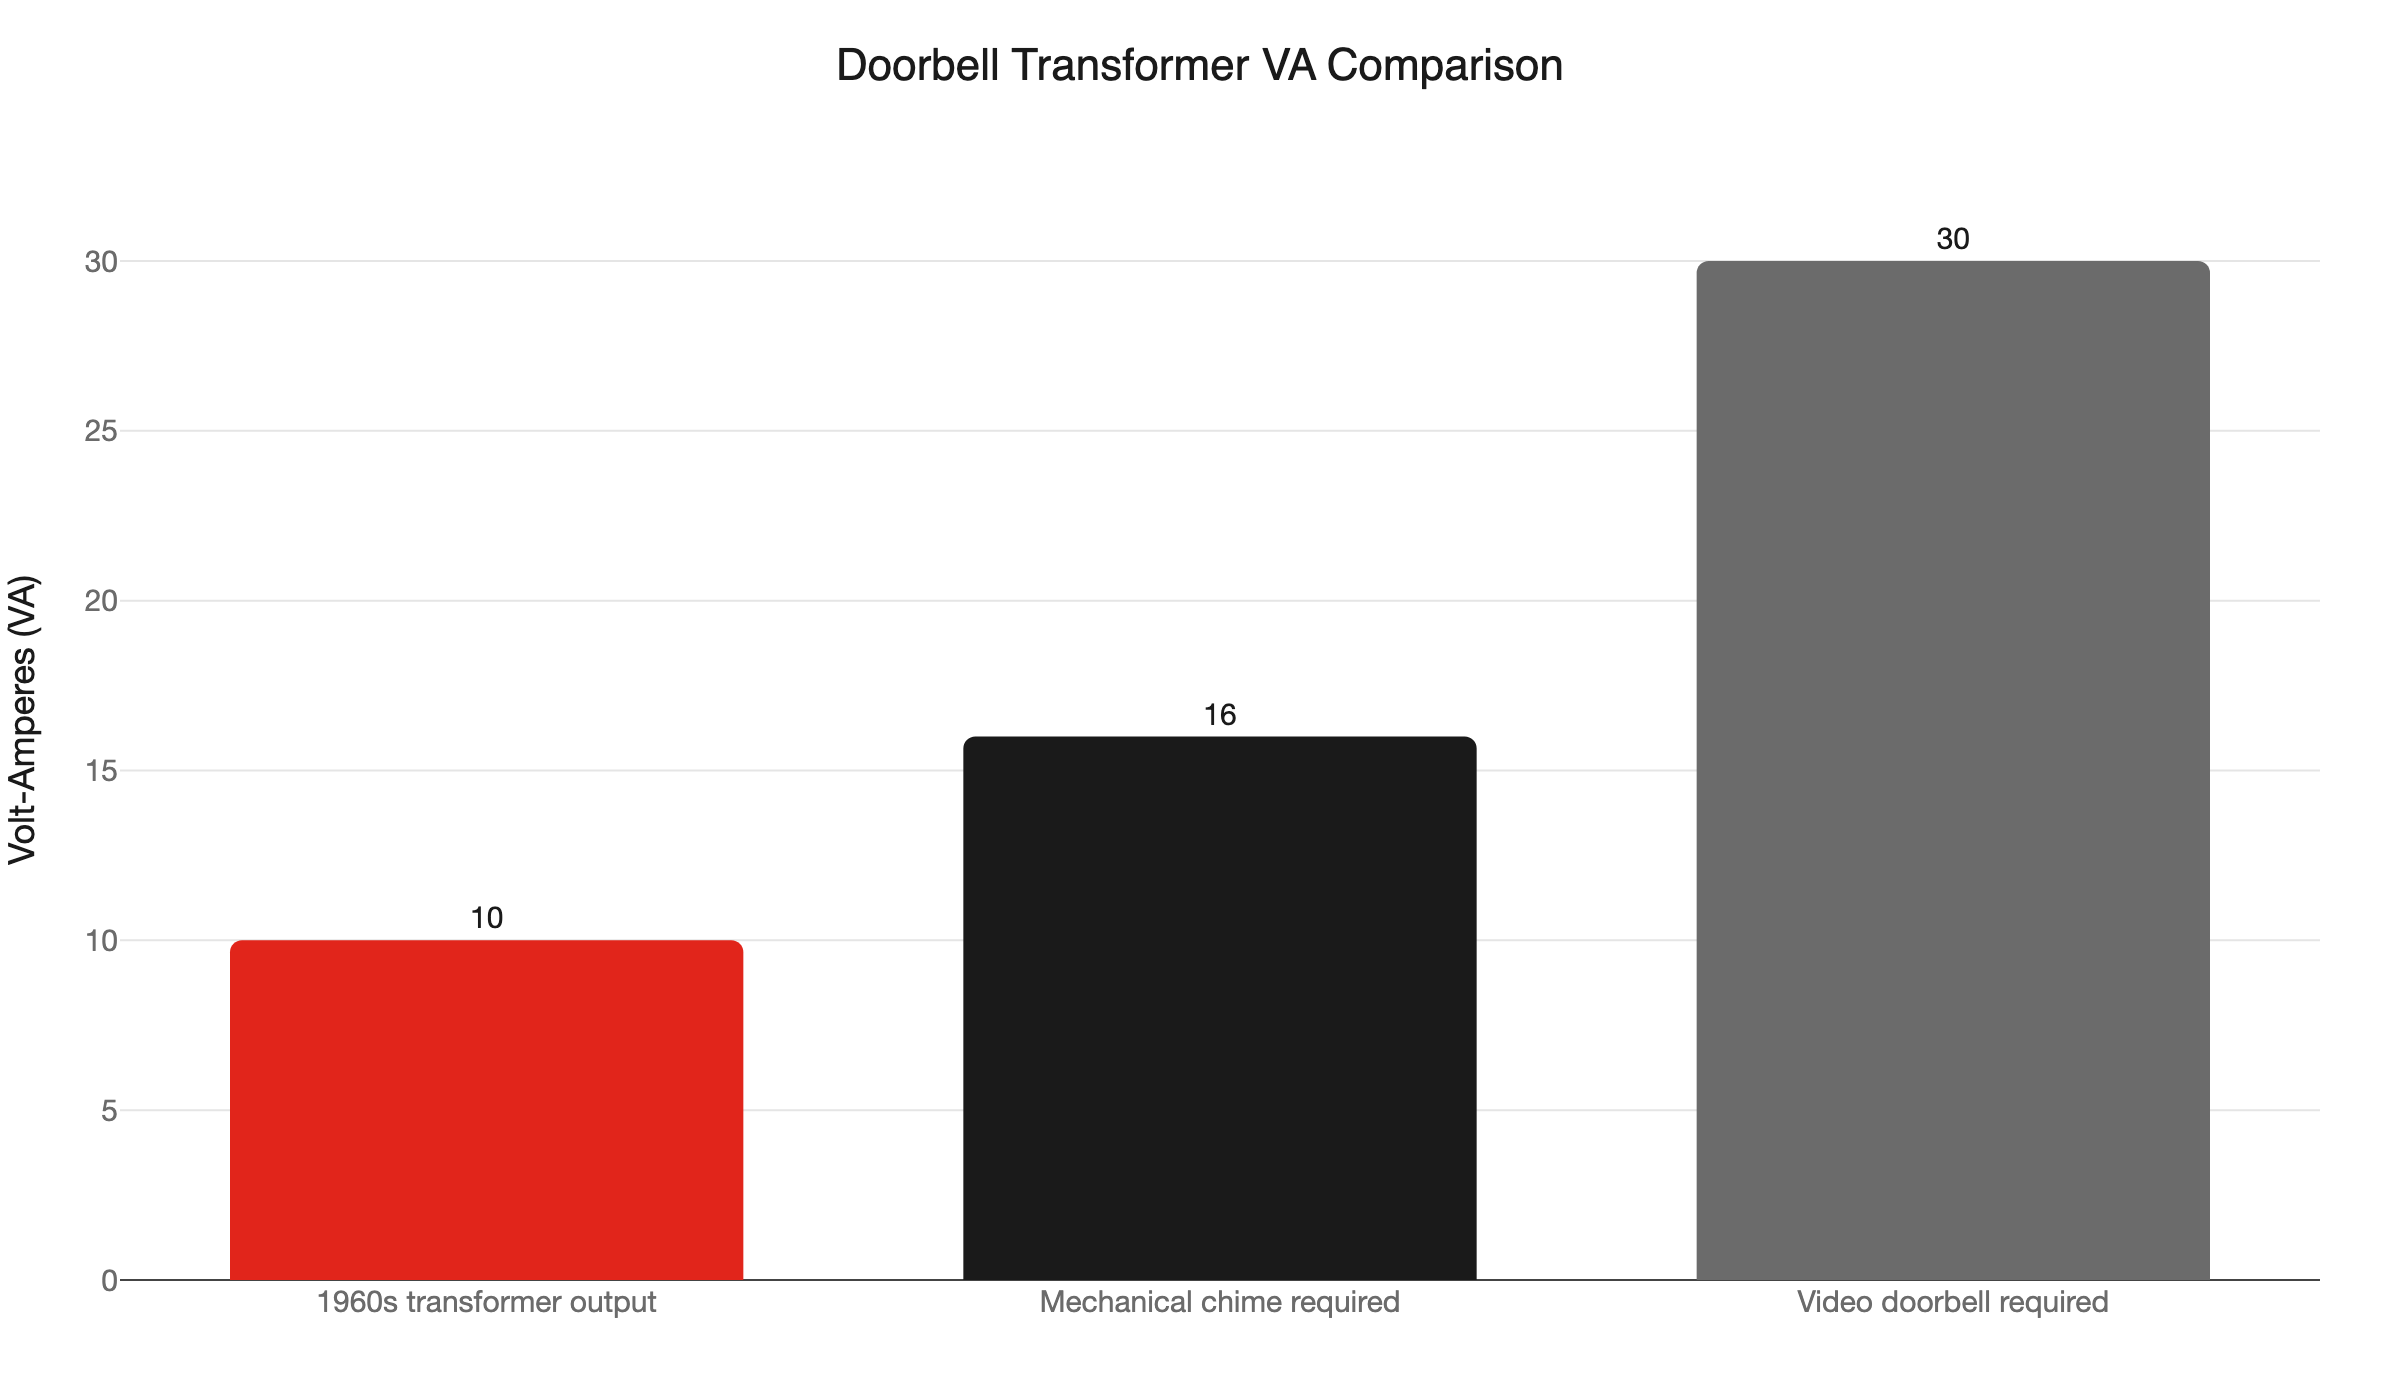
- Original 8-10 VA transformers cannot power modern video doorbells. Ring and Nest units require 30 or more VA at 16-24 VAC. Undersized transformers overheat and eventually fail.
- Minnesota homeowners can pull their own permit at ims.dli.mn.gov. A permit is required whether a contractor or the homeowner does the primary-side work.
- A transformer buried behind drywall without an access panel is a code violation under NEC Article 110. The replacement is the moment to correct it.
- Test the secondary terminals with a multimeter. Below 10V on a 16V unit means replacement is needed. Zero volts with the breaker on points to a primary-side fault.
What Is a Doorbell Transformer, and Where Is It Hiding?
A doorbell transformer steps 120V household current down to 16-24V so your doorbell circuit can operate safely. It hides near your electrical panel, on a basement joist, or in many Twin Cities homes, mounted directly inside the panel enclosure itself.
The transformer is a small rectangular box with two sides. The primary side connects to the 120V household circuit. The secondary side outputs the low voltage your chime needs. Both carry real electrical current.
Most online guides show a transformer mounted in a utility closet or on a joist. That is the easy case. Many Twin Cities homes built 1950-1980 have a transformer mounted to a panel knockout instead. Its 120V wires run inside the panel box. This is legal under NEC 300.15 because the panel enclosure serves as the junction box. But it puts the transformer inches from live bus bars that never de-energize.
Knowing which configuration you have changes everything about what the job requires.
Why Do Doorbell Transformers Fail in Older Minnesota Homes?
Age, VA undersizing, and Minnesota’s extreme temperature swings are the main culprits. Original 8-10 VA transformers get overwhelmed by video doorbells. Our -20F to 90F range cracks insulation and drives corrosion at outdoor terminals over decades.
Minnesota’s climate accelerates failure. Outdoor doorbell button terminals face temperature swings nearly 110 degrees wide. That range brittles 18 AWG bell wire and drives corrosion at exposed connections. Green powder at the button terminals means a failed contact.
Minnesota’s freeze-thaw cycle compounds the problem. A house sitting at -20F for a week, then warming during a January thaw, expands and contracts the bell wire. That movement stresses insulation at staple points and corners. Over 40 or 50 years, the insulation cracks.
Cracked insulation lets two wires contact each other. A shorted low-voltage wire causes a continuous chime buzz. It also draws constant current through the transformer secondary, overheating the unit and eventually burning out the winding.
Paint-covered terminals are another common culprit. A previous owner painted the doorbell button without removing the wires first. The paint forms an insulating layer. The circuit goes dead. The transformer is working fine, but the chime never rings. Many homeowners replace a good transformer before checking the button terminals.
How Do You Test a Doorbell Transformer?
Set a multimeter to AC voltage and touch the probes to the two secondary output terminals. A healthy transformer reads within 2 volts of its stamped rating. A 16V unit reading below 10V needs replacement. Zero volts with the breaker on points to a failed primary winding or a loose 120V connection.
Here is the test sequence:
- Locate the transformer. Check near the electrical panel, on basement joists, or mounted to a panel knockout.
- Set your multimeter to AC voltage, 50V range.
- Touch the probes to the two secondary output terminals. Keep your hands clear of the primary wires.
- Compare the reading to the voltage and VA label stamped on the transformer housing.
What the reading tells you:
- Within 2V of the stamped rating: the transformer is healthy. Look elsewhere for the fault, starting with the button terminals and chime unit.
- Below 10V on a stamped 16V unit: the transformer is failing under load. It cannot deliver enough current to drive the chime or power a video doorbell.
- 0V with the breaker energized: the primary winding has failed, or the 120V connection inside the junction box is loose or broken. This is a line-voltage fault and requires a permit to repair.
The Panel-Knockout Configuration: What Most Guides Skip
This is the setup most how-to guides never mention. It is also the most common configuration in 1950s-1980s Twin Cities homes.
Here is how to identify it. Remove the panel cover. Look along the knockout holes around the panel’s edge. One knockout may have a small rectangular box attached to the outside face of the panel. Its 120V primary wires pass through the knockout. They connect to a breaker and the neutral bar inside the panel. The low-voltage secondary terminals face outward, where the bell wires connect. That is a panel-knockout-mounted transformer.
Replacing this transformer requires removing the panel cover, working inside an energized enclosure, and disconnecting wires near live bus bars. A licensed electrician can de-energize the branch circuit by turning off the breaker. But the main service entrance conductors at the top of the panel stay live. Those bus bars carry incoming utility voltage. They are always energized.
The NEC Article 110 accessibility requirement is satisfied here because the panel cover is removable. But working inside an energized panel demands proper tools, personal protective equipment, and practiced judgment. This is not a first-time DIY project, no malarky. If this is your configuration, call a licensed electrician.
Does Smart Doorbell Wiring Kill Old Transformers?
Yes, over time. Original 1960s-1980s transformers output 8-10 VA. Ring and Nest video doorbells require 30 or more VA at 16-24 VAC. Continuous overloading causes heat buildup, voltage sag, and premature transformer failure.
VA stands for volt-amperes. It measures apparent power: both voltage and current. Your original transformer was sized for a simple mechanical chime that drew almost nothing. A video doorbell streams video, maintains Wi-Fi, monitors motion, and stays powered around the clock. It draws real, sustained current.
What happens when the transformer cannot keep up:
- Output voltage sags under load. A 16V transformer may read 11-12V when the video doorbell is active. That falls below the minimum for reliable operation.
- The transformer runs hot. Heat degrades the secondary winding insulation over months and years.
- The video doorbell resets randomly, refuses to ring, or drops off the Wi-Fi network.
- Eventually the secondary winding fails and the transformer must be replaced.
The fix is not a like-for-like swap. The new transformer must be rated for at least 30 VA at 16-24 VAC to handle a video doorbell reliably. We cover chime compatibility, terminal labeling, and the full installation process in our guide to video doorbell wiring with an existing chime.
Does Replacing a Doorbell Transformer Require a Permit in Minnesota?
Yes. Primary-side transformer work is line-voltage electrical work. Minnesota DLI requires a permit whether a licensed contractor or the homeowner does the job. Homeowners can apply online at ims.dli.mn.gov and legally perform the work themselves.
Minnesota allows homeowners to perform electrical work on their own owner-occupied single-family home. You apply for a permit through MN DLI at ims.dli.mn.gov before starting work. You must personally perform all permitted work. You cannot hand the job to an unlicensed handyman under your homeowner permit.
After the work is complete, an inspector verifies it. Who inspects depends on where you live:
- Minneapolis and St. Paul: Each city operates its own electrical inspection department as the authority having jurisdiction (AHJ). File with the city, not DLI.
- Metro suburbs: Varies. Some file with DLI; others use the local building department. Check the DLI inspector directory before filing.
One timing note: Minnesota adopted the 2026 NEC effective August 17, 2026. Permits filed before that date comply with the 2023 NEC. Permits filed on or after that date comply with the 2026 NEC. Confirm which edition applies to your filing date.
Skipping the permit is not worth it. A missing permit can surface during a home sale inspection and may affect your homeowner’s insurance coverage for related claims. Our guide to the Minnesota electrical permit process walks through each step.
What the NEC Says About Transformer Accessibility
Two NEC articles govern doorbell transformer replacement wiring.
NEC Article 725 classifies doorbell circuits as Class 2 circuits. Class 2 circuits operate at no more than 30V. The transformer must be a listed, approved unit: look for the UL or ETL mark on the housing. The low-voltage wiring must stay physically separated from power conductors. Bell wire cannot share conduit, raceways, or cable sleeves with 120V wiring.
The practical takeaway: do not run the new bell wire through the same joist hole or sleeve as a romex cable. Keep the two systems physically apart.
NEC Article 110 requires the transformer to remain accessible after installation. “Accessible” means reachable for inspection or replacement without damaging the structure. A basement joist: accessible. A panel with a removable cover: accessible. Behind finished drywall with no access panel: a code violation.
Remodels in the 1970s and 1980s sometimes enclosed transformers inside walls. If you find yours buried, the replacement is the right moment to correct the violation. The new transformer must go in an accessible location, or you must install a code-compliant access panel. Budget for that extra work when you pull the permit.
What Doorbell Transformer Replacement Wiring Actually Involves
Here is what the job looks like from start to finish.
Tools you will need: flathead and Phillips screwdrivers, wire strippers, a digital multimeter, listed wire connectors, a non-contact voltage tester, and personal protective equipment if you are opening the panel.
Step 1: Locate the transformer. Trace the doorbell wires from the chime back to the transformer. Identify whether it is panel-mounted or freestanding.
Step 2: Pull the permit. File with MN DLI or your local AHJ before touching any 120V wiring.
Step 3: Identify the circuit breaker. Find the breaker powering the transformer. The transformer label may identify it. Otherwise, use a non-contact voltage tester to confirm which breaker controls the primary wires.
Step 4: De-energize the branch circuit. Turn off the identified breaker. Verify with your multimeter that the primary wires read 0V before touching them.
Step 5: Disconnect the secondary wires. Label and remove the low-voltage bell wires from the transformer terminals.
Step 6: Disconnect the primary connection. Inside the junction box or panel enclosure, remove the wire connectors linking the transformer to the 120V circuit.
Step 7: Remove the old transformer. Unmount the unit from its bracket or knockout.
Step 8: Mount the new transformer. Match the VA rating and output voltage to your doorbell system. For any video doorbell, the new unit must be rated for at least 30 VA at 16-24 VAC.
Step 9: Reconnect the primary wires. Connect the 120V wires to the new transformer’s primary terminals using listed wire connectors. Ensure the junction box closes properly.
Step 10: Reconnect the secondary wires. Attach the bell wires to the secondary terminals. For smart doorbells, follow the manufacturer’s wiring diagram for correct terminal labeling.
Step 11: Restore power and test. Turn the breaker on. Test secondary output voltage with the multimeter. Verify the doorbell rings and any smart doorbell app connects.
Step 12: Schedule the inspection. Do not close access panels or patch drywall until the inspector signs off.
When Should You Call a Licensed Electrician?
Call a licensed electrician when the transformer is panel-mounted, when you read 0V on the primary side with the breaker on, when you cannot locate the transformer, or when managing a permit and inspection feels like more than you want to handle.
Call us also if you run into any of these:
- The panel serving the transformer appears on the list of electrical panel brands with known problems in Minnesota. Opening the cover for a transformer swap may reveal a larger problem that needs immediate attention.
- The circuit feeding the transformer also runs hot, shows burn marks, or trips without explanation. That points to a problem beyond the transformer and may connect to signs you need an electrical panel upgrade.
- You find the transformer buried behind drywall with no access panel. Cutting drywall, relocating the transformer, and correcting the code violation is more than a simple swap.
- The existing bell wire shows severe cracking, exposed copper, or covers a run significantly longer than 50 feet. Degraded wiring causes persistent problems even after a new transformer is installed.
Our team traces the full circuit on every service call. If there is a problem in the wire run, at the chime unit, or at the panel, we find it on the same visit.
We are locally owned and operated in the Twin Cities. As America’s On-Time Electrician(R), we arrive when we say we will. Every job is backed by the UWIN(R) 100% satisfaction guarantee.
What Does Doorbell Transformer Replacement Cost in the Twin Cities?
Transformer hardware costs $15-$40. A joist-mounted swap typically runs one to two hours of licensed electrician time. A panel-knockout replacement takes longer and may require two licensed people on site. Budget separately for the MN permit and inspection fee.
The transformer hardware is a small cost. Labor is the main variable and depends on the configuration. A freestanding transformer in the basement is fast work for an experienced electrician. A panel-knockout transformer requires more setup, more care, and more time adjacent to live conductors.
Permit fees vary by municipality. Minneapolis and St. Paul publish their own fee schedules. Metro suburbs vary widely. Budget for the permit fee and inspection visit as part of the total project cost.
If the replacement uncovers a larger upstream problem - a failing breaker, a damaged conductor, or an undersized panel - those repairs add scope and cost. If your home is 40 or more years old, ask your electrician to assess the panel during the same visit. That conversation can save a separate service call and help you plan future electrical work.
Call us at 763-200-5956 or book online. Our locally owned Twin Cities team will locate the transformer, pull the permit, and get your doorbell running on the first visit.
Frequently Asked Questions
Do I need a permit to replace a doorbell transformer in Minnesota? +
What voltage should a doorbell transformer read? +
Why does my new video doorbell not ring? +
Can a doorbell transformer be inside my electrical panel? +
Need an electrician now?